
 |
| Pretty AND delicious! |
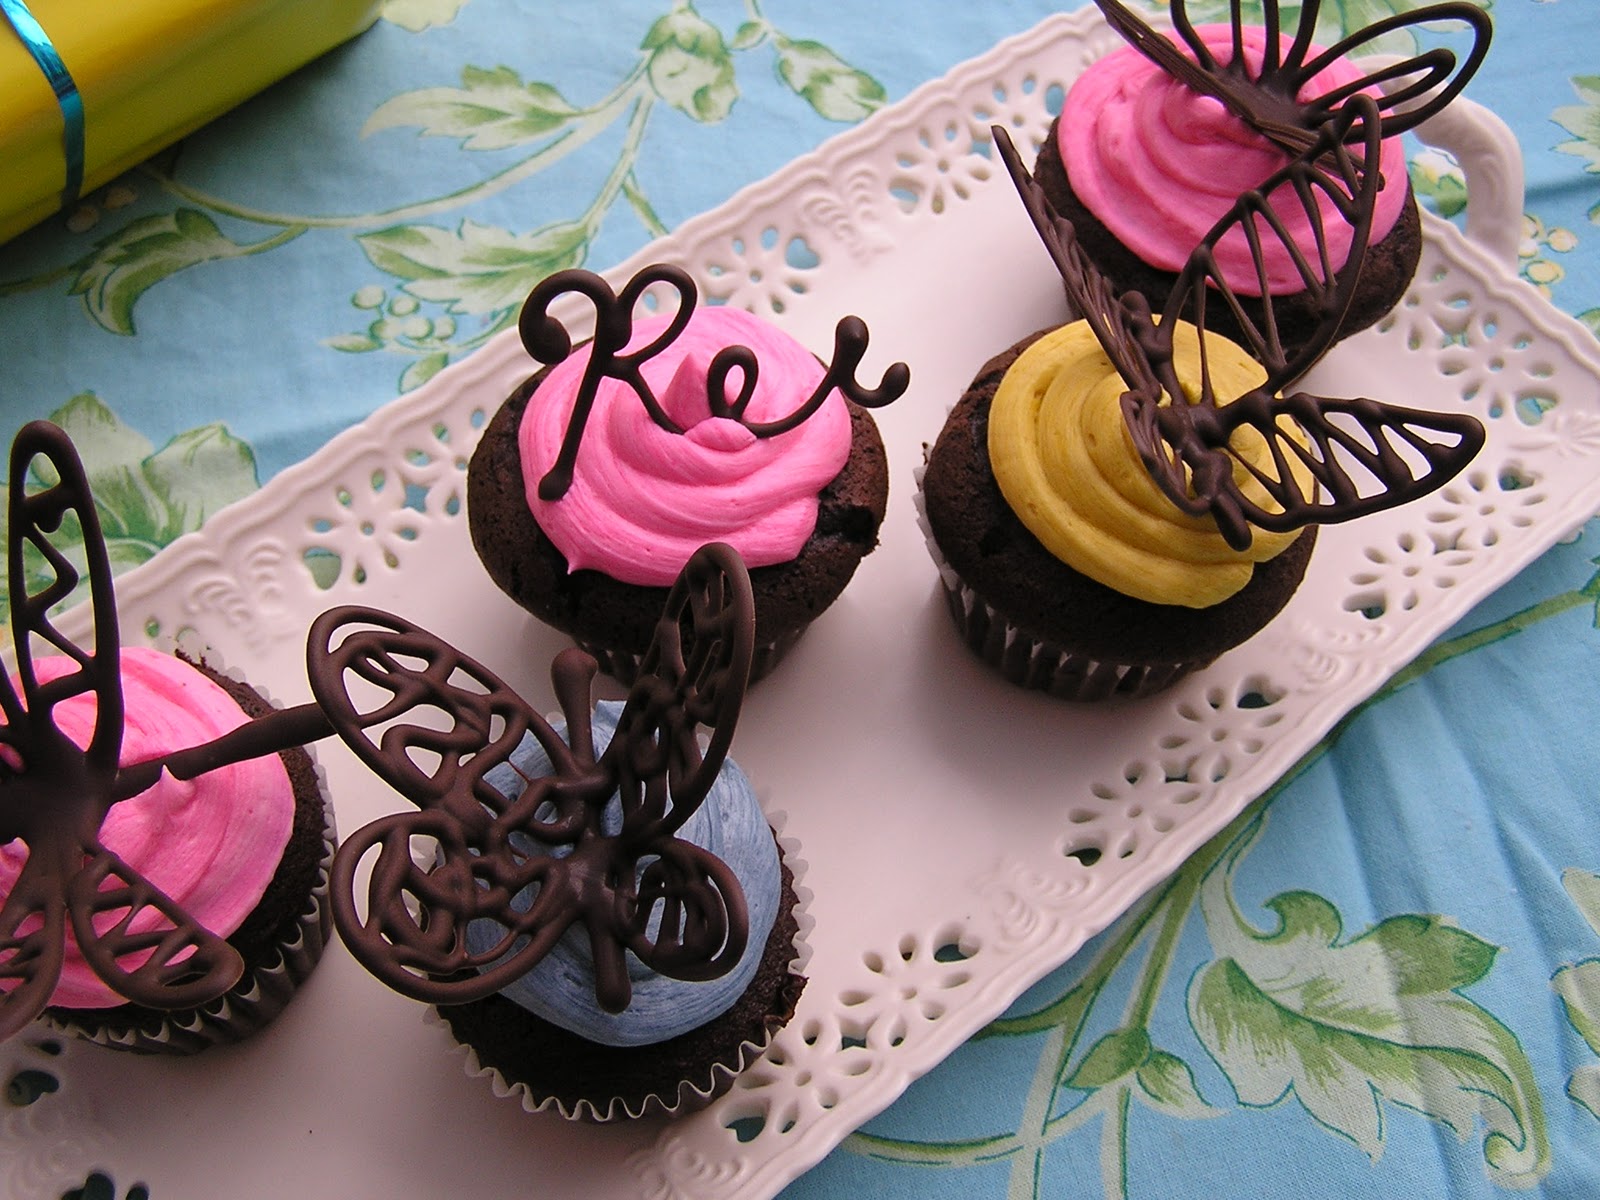
Learn to make easy, fast, and beautiful chocolate butterflies after the jump!
You will need:
- Chocolate chips (the less tasty, more waxy melting chocolate from the bulk bin is best) in your choice of colour.
- A ziploc freezer bag.
- Parchment paper.
- 8 1/2" x 11" (or thereabouts) card stock.

Prep:
- Fold your card stock lengthwise down the centre. Open it up to about a ninety degree angle.
- Cut sheets of parchment paper about the same size as your card stock, and crease them down the middle.
- Make lots of room in your freezer.
Making the butterflies:
- Heat a bowl of water in the microwave for about two minutes - long enough to get the water hot but not boiling. Meanwhile, fill your ziploc bag with a big handful of chocolate chips.
- Spread the chocolate out in a single layer in the bottom of the bag and set the bag in the hot water. Turn the bag over a few times and smush the chocolate around until it is all melted - no lumps!

- Squeeze all the chocolate into one corner of the bag, and, holding it like a pastry bag, snip off the corner. You only want to snip a tiny bit off - you want a hole that is small enough to be precise, but large enough that the chocolate can flow easily through it.
- You will be drawing your butterfly on the parchment paper, using the crease as a guide for the centre of the butterfly's body. Start by drawing a stick in that crease, then add wings on either side. Try for symmetry, but don't worry too much. You want to keep your hand moving in a steady, flowing motion so you don't get any lumps or thin spots.
 |
| Photographing oneself doing this is tricky, hence the lumps. This butterfly was a taste test sacrifice. Yum! |
- You can probably get about three 2 1/2" butterflies on one page of parchment paper. Let your butterflies sit for just a moment, so the chocolate can cool a little bit. Gently lift your parchment and set it into your folded card stock, lining up the crease in the paper with the fold in the card stock. This folding lifts the wings of the butterflies.
- Put your butterflies in the freezer to harden (using various items from your freezer to prop the card stock up if necessary). Leave them at least three minutes - or longer if you have time. You will know your butterflies are ready when their wings peel easily away from the parchment paper.
 |
| Frozen bananas make great props ;) |
- Experiment with different shapes and styles of butterfly! I also had great success making dragonflies - they looked very dramatic with their long wings and were quite popular with the gentlemen at the party.

- Decorate cupcakes, cakes and more! Keep your little works of art in the freezer until you are ready to use them, and try no to handle them any more than necessary. They break very easily, especially if they are thin or large.

I am still so in awe of these...you have taken cupcakes to the next level!
ReplyDeleteLove these! Will use them for a Spring gathering of family.
ReplyDeleteWhat a great idea!
ReplyDeleteWow, thank you for sharing
ReplyDeleteI have made the ones that are flat. But I love the ones that you did.
ReplyDeleteWill surely try, if I have time left, even this weekend. They look so beautiful
ReplyDeleteHow easy!! I love this tip! We are getting ready to have a cupcake party and these are great!
ReplyDeleteIf you are pushed for time, make the wings in two halves, and let them set, flat. Less space needed in freezer. Then just use the icing to make them stand up. Here's how mine looked.
ReplyDeleteThese are amazing!! They came out so beautiful and your tutorial is very well done.
ReplyDeleteI featured you on my blog this morning. Stop by to see the post and pick up a "featured" button for your blog.
http://flexibledreams.blogspot.com/2011/02/featuring-chocolate-butterfly.html
Awesome! Enough said!
ReplyDeleteI pretty new to this baking thing, but i loved these, they are so simple and they look so cool.
ReplyDeletealso, there are so many possibilities and here are some of what I came with (the ruffle cakes were attempts to make this: http://sparkleandhay.blogspot.com/2011/02/how-to-decorate-cake-tutorial-from-la.html)
ReplyDeleteand you can totally disregard the rose, i was bored. but here are my modified chocolate butterflies: http://www.flickr.com/photos/thisurlisnotformybenefit/?saved=1
I cannot even begin to express how gorgeous these are! They're almost too pretty to eat. I can't wait to try it! Thank you for providing the tutorial (would have been a pain to try to translate the Japanese). :) I'm certain your daughter enjoyed them.
ReplyDeleteLove your site! Your creativity rocks.
Rachel
P.S. I also saw your post on the adorable cloth diapers you knitted! Amazing! We did cloth diapering with our first son, but when the second one came along, it was just too hard. Your diapers are almost too pretty to soil! :)
I love these! My daughter's 2nd birthday is coming up very soon, I think I'll make some shoes and crowns to top the cupcakes for her princess party. Thanks for writing up a tutorial!
ReplyDeleteThese are just SO GREAT!! Thanks for the tutorial :)
ReplyDeleteThanks for the tips- I love the card stock idea, and thank you thank you thank you for the tip of melting the chocolate in the bag. DUH. I always make such a huge mess melting the chocolate and then attempting to put it into a bag after the fact. I never sought out to fix the problem because I always just ate whatever mess I made. :)
ReplyDeletesuch a simple idea but so very effective - thanks for the tips - hugs
ReplyDeleteThese are so lovely! My daughter and I tried this yesterday, neither one of us are as steady a hand as you are at piping, but it was a fun process. I put some pictures here:http://showtellshare.blogspot.com/2011/02/butterfly-cupcakes.html
ReplyDeleteI just made these for my mother-in-law's birthday. I had trouble with them getting too soft as soon as I took them out of the freezer. Most of them fell apart as I was taking them off the parchment, but the ones that did make it melted - yes, MELTED - once they were on the (chilled) brownies. Anyway, all that's to say, definitely use the dipping chocolate , which hardens a little better than plain chocolate chips. Or you can add a little bit of shortening or oil, which also makes it harder when cooled. But this tutorial is GREAT!! Such great tips, thanks for sharing!!!
ReplyDeleteAMAZING!!
ReplyDeletethank you very much! your tips are precious
ReplyDeleteYomi yomi.... is great... is very nice... Saludos desde México
ReplyDeleteLove love love these. Will be sharing!
ReplyDeleteWhat a great idea! Can't wait to make these!
ReplyDeleteFor the Love of Food
www.nicolelucianaepperson.blogspot.com
I am in LOVE with this!! Amazing!! I WILL be making these for the next party :D Thanks so very much for sharing!! I'm also your newest follower...can't wait to see whats next!!
ReplyDeleteTrisha
Wow! That is fantastic! Thumbs up on the butterflies! They are so beautiful and you really did a great job!
ReplyDeleteolá!! Muito lindos!!
ReplyDeleteParabéns...mas ainda não falo inglês...se pudesse traduzir...beijuxx!!
Thank you so very much for the post!!! Doing my daughter's 5th birthday w/a butterfly theme and this will work out GREAT!!!
ReplyDeleteWay better than butterfly picks :)
love this made a gr8 surprise party treat... my freind loves cupcakes and adores butterflies :) thx you have been a great help!
ReplyDeleteCan't wait to try these. I am making a butterfly cake for my daughter's 1st birthday in three days, and I was looking for how to make a butterfly shaped cake. I came across these, and I'm so excited about how much these will add to the beauty of the cake! I'm not the craftiest person, so this will be something easy I can do! Thanks so much!
ReplyDeletethese look great and i shall be adorning my cupcakes with them!!
ReplyDeleteEnter your tutorial into our Party Tutorial Contest (http://www.purejoyeventsblog.com/2011/06/party-tutorial-contest-2.html) for a chance to win some fabulous prizes totaling over $200.
ReplyDeleteI JUST tried these for a cake (that took 5 hours to make *gasp*) for my mums wedding.. thanks a million for the post.. they are in the freezer now :p
ReplyDeleteLOVE LOVE LOVE these! I'm going to have a go this afternoon! Will refer back to you on my blog :) You make it all look so easy!
ReplyDeleteHello friends,
ReplyDeleteButterflies are a symbol of new life in many cultures and are used to celebrate spring. Plain cakes can be dressed up with chocolate butterflies, as can cupcakes and mini-cheesecakes. Cakes for all occasions can be customized with butterflies in white, dark, milk or colored chocolates. A butterfly cake will enhance any party, from a child's birthday to an elegant garden wedding. Thanks a lot.....
Soo awsome, thank you so much :)
ReplyDeletei suscribe your blog:)
ReplyDeleteI have an blog too!voisinfrenosstyle.blogspot.com
thank's!:)
kiss*
Wow, just put my own in the freezer... This was actually a really easy recipe! My technique could still use some work though! Thanks :)
ReplyDeleteSimply marvellous!!
ReplyDeleteThank you!
That's so creative! Love it! I'm going to try it for my daughter's birthday party. I'm making a butterfly cake, but will need cupcakes to make sure there is enough desserts for the guests. What kind of bulk chocolate are you talking about? Baker's? Anybody shop at H.E.B. and know where to find this kind of chocolate she is talking about?
ReplyDeletembaladez3 - the chocolate is milk chocolate melting chocolate - the flavour isn't great, but it's made for this sort of thing. It comes in large flat chocolate chips. At least where I live, you can find it in the bulk bins in every grocery store. I wouldn't use bakers because it might be harder to work with.
ReplyDeleteGood luck!
Awesome! Most Impressive! As I have seen one of most simple but the most creative feature about this cake. The Chocolate Butterfly is really looking beautiful on those. It's truly one of awesome idea. Thanks for sharing.
ReplyDeleteOhhh neat! this looks like something I could do! Thanks!
ReplyDeleteLesley byporchlight.blogspot.com
I think so its best idea for decorating cakes like this . seriously nice work :). I appreciate your hard work.
ReplyDeleteLoved the idea - but found, like others, that the chocolate ones soon collapsed when taken out of the freezer.
ReplyDeleteHOWEVER - have discovered that you can do the same thing with left-over royal icing. Do the same shapes on to paper & rest in a folded card. No need to put in freezer - just prop the card & leave to air-dry. The icing, once hard, will stay hard . . . . & the butterflys will FLY - terrific idea, thanks.
Great tutorial - Thank you. I had a practice run for my daughter's Christening cake. As I'm not the best free hand drawer, I printed off a clipart butterfly image and put it under the baking paper as a guide.
ReplyDeletethis is probbebley one of the best things i have ever made and im only 13 but i love to cook and this has enspired me evan more to cook
ReplyDeleteThis comment has been removed by a blog administrator.
ReplyDeleteOmg! Love these. Will be adding these to my cupcakes!
ReplyDeleteThese would also be beautiful using pastel colored white chocolate or royal icing. I also love the tip to use a cheat sheet picture under the parchment for those of us that don't have the steadiest hands. Thanks
ReplyDeleteIf you open cookpad.com in Google Chrome it will come up automatically to translate the whole webpage from Japanese to English. Some awesome recipes on there!
ReplyDeleteWhat an awesome and easy looking idea. I am saving this to my blog (my first blog and it is completely unfinished) but I didn't want to lose the link. Thanks for sharing!
ReplyDeleteAfter reading through.. I came up with an idea! If you are making decorations for a younger audience (say, a child's birthday party), you could use white chocolate and add a few drops of food colouring to make the chocolate butterflies/decorations a little more fun!
ReplyDelete**This is just an idea and I have not tried this yet!
WOW, these are beautiful, thanks for sharing.
ReplyDeletesuperbe idée je vais en faire merci
ReplyDeleteThese are great! I will be doing this today!
ReplyDeleteThought I'd make you aware of a Facebook page that has used your images with their own watermark. I can't report them since it's not my work.
ReplyDeletehttps://www.facebook.com/photo.php?fbid=269547946515556&set=pb.197939013676450.-2207520000.1366163335.&type=3&theater
Thank you Jill! I have contacted the page's owners. I really appreciate the heads up.
DeleteIf your a perfectionist like me, you can print a butterfly stencil from a stencil website on the cardstock and it will show through the parchment. I pre-fold the paper and flatten it a little when piping and then prop it in the freezer as well.
ReplyDeleteIf your a perfectionist like me, you can print a butterfly stencil from a stencil website on the cardstock and it will show through the parchment. I pre-fold the paper and flatten it a little when piping and then prop it in the freezer as well.
ReplyDeleteMaravilha gostei muito.
ReplyDeleteI have made these before. Instead of cardstock, I used an egg carton, turned upside down, to create the wings of the butterflies.
ReplyDeleteGreat idea thank u
DeleteThanks for the idea! I love trying new creative things like this! :)
ReplyDeletethey are so beautiful thanks for sharing tak care
ReplyDeleteThese are absolutely delightful! Making these this weekend! Thanks! Lovely pictures!
ReplyDeleteAny brand chocolate you might recommend? Not really sure which I should be using. Not sure which ones you're talking about.
ReplyDeleteThanks!!!
I'm not sure about brands - generic dipping chocolate or melting chocolate is best. It's the cheap stuff, generally available in several colours, and it doesn't taste all that great.
DeleteCan they sit out at room temperature after freezing them? I want to make some the night before I'll need them. I assume putting the cupcakes with the butterflies on top of them in the fridge would make the chocolate get condensation on them when you took them out and might mess it up. Thoughts?
ReplyDeleteI would suggest just leaving them in the freezer and assembling on the day of your event. They might be alright left out if your house iscold!
DeleteThanks for sharing
ReplyDeleteI have been reading your posts regularly which is specially for cake decorating supplies UK.I need to say that you are doing a fantastic work. Please keep it up the great work.
ReplyDeletecake decorating supplies UK
Your blog have allot of detail about the Matilda Chocolate Cake it's good job.
ReplyDeleteMatilda Chocolate Cake
Interesting post that provides relevant information and it helped me a lot. Please keep posting such relevant information.
ReplyDeleteEdible Colouring Pens
Edible Ink Printers
Edible Printer
Edible Frosting Sheets
I’m going to try this thank u so much for sharing
ReplyDeleteTired of sugary, basic treats? UNBOtheRED Chocolate is an adult chocolate that caters to refined tastes and wellness goals at the same time. Can’t recommend it enough.
ReplyDeleteThose choco butterflies are amazing – such a great use of different mediums and a real inspiration for cake decorators. From icing sheets and the edible printer kit to the airbrush cake decorating kit, the results are stunning.
ReplyDelete