New in the Shop!

Showing posts with label Recycling/Upcycling. Show all posts

Wednesday, June 15, 2011

Links: Upcycled

credit


I love people's upcycling tutorials. I do find that it would often cost a fortune to make a replica of their tutorial because it isn't often you find the exact same recyclable treasures as someone else. They're great inspiration though. Here are a few links to tutorials I like - they are even made from things you might be able to find!


Get the links after the jump!

Monday, May 9, 2011

Everything Old Shop Update: Stitch Markers!

I'm really sad that these are going to the shop, and not to my knitting basket. They are all stitch markers for knitters (crocheters - I know you need love too, but as I'm not much of a crochet artist, I don't really know what you need in the way of stitch markers :( leave me a comment if you have suggestions OK?). They won't snag your knitting or scratch your needles, they are durable and sturdy, and they're so pretty! I hope you like them.

Large Size, for almost any project:


Medium Sized, which fit up to a 10 1/2 needle but are fantastic for even the little needles:


Teeny tiny, for sock knitters:


And, my very favourite, upcycled keyboard numbers, for the gamer or computer lover (or lace knitters - these are extremely light and won't weigh down your project or make your circular cables sag and bounce around):


Go have a look! I try to keep the prices as reasonable as possible, which is nice for you!

Wednesday, May 4, 2011

Tutorial: DIY Yarn Swift for under $15, and some helpful links!

I decided (in lieu of my normal Wednesday links) I'd share a tutorial for my awesome DIY yarn swift, as well as the links to the projects that helped me arrive at my final product. This swift combines all the best attributes of the other DIY swifts I liked, without as many setbacks. It's sturdy as heck, spins on ball bearings, adjusts to hold a skein as small as one yard or bigger than three yards (this was a requirement specific to my large skein niddy noddy - enormous skeins are great for dyeing), can be disassembled for storage, and cost me about $12.


Get the tutorial and links after the jump!

Thursday, April 7, 2011

How To: Turn a Desk Calendar into a Wall Calendar - Framing a Book!

I've been using a day planner for years now, but lately I've learned that I am not the only one in this family that needs a little help staying on top of daily planning. However, keeping a wall calendar is no good, because the little squares are way too tiny to write much of anything in. I'm not into the look of those giant wall calendars with the dry erase pens. I like organization, but not that much. Thus I decided to convert my beloved desk calendar into a wall calendar the whole family can use.


 Ours is mounted on the wall, but it's in the dark, ugly grotto next to the door, so I photographed it resting on a shelf.  Where, I might add, It looks awesome.


Get the tutorial for a wall mounted desk calendar, and for the mods to safely prop it on a shelf in the long term, after the jump!

Monday, March 21, 2011

How to: Make a Flower from Recycled Knitwear

Remember that sweater vest that I made into a dress for Rei? Well, it also yeilded a pretty fabric flower!


I love this - it has a wonderfully distressed yet feminine edge, and it's so versatile! I still haven't decided if it wants to be a hair bow, a brooch, a purse accessory, part of a necklace, or an accent on a dress. Currently, it lives on my desk, waiting for the perfect home.

Get the tutorial after the jump!

Tuesday, March 15, 2011

How To: Make a Baby-Sized Play Dress from an Old Sweater Vest


Jake is a sweater vest wearer. This is awesome, because I think he looks super hot in them. However, he's hard on his clothes and they do get in pretty rough shape, pretty quickly. I decided to give one of his vests - 100% cotton with a great big hole in a seam that wasn't worth fixing - a second life as a play dress for Rei, and I thought I'd share my pattern drafting and dress making tutorial. Just so you know, this isn't a recipe for a pretty party dress, it's a comfy, cosy, hard-wearing little number; made for a little girl who is almost as rough on clothes as her daddy is.

Get the how-to after the break!

Monday, January 10, 2011

Meta Book Shelves

When I saw this photo tutorial, linked through One Pretty Thing, I fell in love. It took me a year or so to find the space, but when we got a Kinect for Christmas and had to re-arrange the living room to increase our gaming space, the wall formerly occupied by the TV opened up a world (well, a small wall) of decorating opportunity. Check these out!


Friday, December 17, 2010

Star Wreath Tutorial

Do you (or someone you know) get a real Christmas tree each year? Mmmmm that smell...
Do you buy one that is much too tall for your ceiling?
Do you have to cut part of the top off to make it fit, and then manicure what's left of the top so it doesn't end in an unspectacular tree-plateau?

This happens EVERY YEAR at my parents' house. I took the manicure trimmings home to see if they could be put to some use, and I came up with a simple, practically free wreath that I just love. Look at it! Don't you want one?


Isn't it sad that I don't even have an available door to hang this on?

Monday, November 29, 2010

Extra Awesome DIY Recycled Duffel Bag Tutorial

I think the title really says it all on this one. My dad had an old sail that was no longer in use, and he commissioned me to turn it (well, a tiny fraction of it - there's a LOT of yardage in a sail) into a few duffel bags for his sailing gear. If you live near a large body of water (or perhaps even if you don't) you may have access to used sails - see if there is an exchange or something at a marine shop. Maybe you can get one on the cheap that has ripped. All sails are not made alike - different high tech textiles serve different purposes. Some are papery and almost translucent, others are sturdy and don't bend easily. Sometimes they are brightly coloured. The sail I used was on the sturdy end of the scale, yet is still light. It's woven, but doesn't fray. It's extremely strong, but somewhat prone to ripping along seams. All in all, it's a really awesome find and I can hardly wait to be done making all the Christmas stuff so I can play with it. It did get spray painted black (pirate costume... not mine... don't ask) at one point, which isn't beautiful, but I like it anyway.


No sail? You could recycle the leaky old canvas tent in your uncle's garage, or a car cover you no longer have a car for, or whatever you want. It just needs to be strong stuff.

So, stop blathering and on with the tutorial right?

The smaller bag, with pockets on the inside.

Tuesday, September 7, 2010

Something to Show

Hi!

I've been more than a little absent from blogland lately. Sorry. Like I said last post, Christmas presents kinda kick my ass time-wise, but I really love making them so I let the non-essentials slide. Yep, blogging is a non-essential. Unless it starts making me money that is; then I will blog till my fingers are blistered and my brain is empty.

Another problem with spending most of my creative time on presents is that I can't show them off when they are finished. It's terrible - I'm really proud of a few of the things I have made (6 completed items so far!) but right now it's all a big secret in case someone stumbles across their future gift.

One present that I am able share is a part of my sister in law K's Christmas present. She is on a mission for the LDS church right now and is therefore unable to see most of the interwebs, including this bloggy backwater. K is awesome. I don't know if she knows I think that - I guess I should write her and tell her. She's a really cool person and I wish I knew her better. She is a fantastic artist, and all the artists I've ever met need sketchbooks, so I made a book cover for her.


Isn't the fabric fabulous? I bought it from Fabricworm - beware, if you follow the link you may experience multiple fabric-gasms. Their selection of quilting fabric is toe curling. Oh and the prices are good and shipping is really fast, should you choose to consummate your newfound textile relationship.

Ok I'm going to stop comparing online fabric shopping to sex now. I'm neither as lonely nor as creepy as I sound.

And, because I know you still want to get into my head, even after the fabric/sex thing, I thought I'd share my post-design notes for this project with you. This isn't your grandmother's hand-holdy tutorial, beware.

You need:
  • Fabric - I used 2 different fabrics but I don't care what you do. Well, I care in the sense that I think it's nice that you'd consider taking inspiration from something I made, but I'm not going to be hurt if you don't listen to what I tell you to do.
  • Coordinating extra-wide double-fold bias tape.
  • Clear vinyl. I used a bag that some baby thing-or-other was packaged in.
  • EZfelt. It's a stiff felt-like stuff made of recycled plastics. I got it at Michaels.
  • Fusible web (non-woven double sided heat fusible interfacing).
  • Thread and stuff.
Ok, this is all you get. Use the pictures above, and your imagination, to get a finished product that suits your needs. I wrote this down so I would remember what to do if I want to make another one of these bad boys - my original notes were on a scrap of EZfelt.


My brain is considerably messier than my notebook.

Friday, June 18, 2010

The ugly shirt continues to provide

While I was cutting out the pieces for the baby toy in the last post I looked at my pattern pieces and thought "Hey! Looks like Legwarmies!" In saying 'legwarmies' I am not trying to be cute; it's a sweet baby leg warmer knitting pattern found here. I was about halfway through making them and they were very present on my mind because they were working up fabulously. Anyway, I decided to make some legwarmers for R. Here's what I did (you'll need an unwanted knit shirt with cuffs, or, of course, some fabric). I love the utility of this project. They make dresses possible on cold days, they don't have to come off for a diaper change, but they do come off easily if it warms up while you are out and about.

Take your 8.5 X 25.5 cm bit of cardboard from the previous project and use it to cut two pieces of knit fabric on the fold (so they are actually 17 cm wide). Cut off the cuffs of your shirt, cut the seams off, and then cut them into two. They will be folded (like they were when they were cuffs). Like this: (all these pieces are folded)


Stretch out the cuff pieces so they are the same length as the short ends of the leg warmers and sew them on, enclosed-cuff-style. I recommend lots of pins to keep everything even; the stretched cuffs can be tricksy.


You will have a little two ended sleevey thing, comme ca:


Make another and apply them to the adorable infant of your choosing. Cute poses are pretty easy to photograph, what with the proximity of sweet little baby feet. Aww....


Are you in love yet? I like that they are sort of Tim Burton-esque. I bet if Jack and Sally or Victor and Victoria had babies and put them in leg warmers, these would be the ones.

Oh, and the knitted Legwarmies are also a success.

Saturday, June 12, 2010

A bright future for an ugly shirt

I bought a set of fleece pyjama pants to wear in the hospital when R was born, and they came with an enormous black and white striped shirt. The thing was hideous on me (Horizontal stripes on my pregnant 2X self. Seriously people... why?) but the fabric was a super snuggly soft 1X1 rib in 100% cotton, so I kept it around, just in case. When I read that really young babies have trouble distinguishing anything other than very high colour contrast, and hence love graphic black and white toys, I knew my convict-esque shirt had a future. I set out to make a simple cuddly sphere for her to drool all over. She loves it so much I thought I'd share.

First, cut a piece of cardboard into a 25.5 x 8.5 cm rectangle (the short end is exactly one third the length of the long side) to use as the pattern. Using this as a guide, cut 2 pieces of t-shirt on the bias. I think if your fabric is a stocking stitch knit rather than a rib you could cut on grain, but a rib stretches too unevenly to cut on the grain for this project. Try it if you like (I did, with unspectacular results) but I think you'll have better luck on the bias.


Using the short end of your cardboard pattern, measure one third of the way along the long side of one of your fabric rectangles. Position the short side of the other piece along this long side, covering the middle third of the piece and making a T shape. Pin. Wow... that makes no sense. Look at the picture OK?


Sew along that pinned edgeuntil just before you reach the end of the short side of the top piece of fabric. Re-align the edges of the 2 pieces, and continue sewing around, matching up the edges in thirds as you go. Essentially you are making a cube - each rectangle makes up 3 sides. Leave a smallish hole at the end of your seam. Turn, and stuff.


Sew up the hole, inserting a loop of ribbon so you can hang the toy or hook it to things with a plastic link. I embroidered some hearts in red, blue, and yellow on mine. I forgot to take a picture of the finished product when it was new, and it's had some love over the past few months, but here's what it looks like now:


R loves this thing. It's really squashy so she has been able to grab onto it with her clumsy little mitts ever since she first began to show interest in holding onto her toys. Mostly now she tries to shove it in her mouth, which is pretty fun to watch as it's almost as big as her head.

I think this fabric ball is a great, versatile toy because it can be simply modified with greatly varying results,  and doesn't take as much sewing as a 6 piece stuffed cube/ball/thing. Make it in a non-stretchy fabric for a more cube shaped toy, or stuff it with a cube of foam instead of polyfill if you want something that would work like a building block. Throw a few jingle bells or some crinkled up cellophane inside so it makes sounds when baby plays with it. Use different textured fabrics like corduroy or vinyl, or sew tabs of ribbon in all the seams to give it tactile interest. Put a securely sewn sachet of dried lavender inside to stimulate baby's sense of smell. Have fun with it and baby will too!

Saturday, April 24, 2010

A Very Merry Un-Earth Day

I have been thinking about an Earth Day post since Thursday morning. I wanted to talk about how important it is to conserve natural resources; to reduce (reuse, and recycle) the colossal amount of plastic crap we consume every day. However, the more I thought about it and thought about it and thought about it, the more frustrated I became. Here's why:

One day isn't enough. One week won't do it. A year doesn't scratch the surface of the real problem. Stores offering Earth Day sales on "green" products (some considerably less green than others) are a perfect example of this short-term eco-friendly attitude. We are repeatedly told that we can reduce our environmental impact if only we purchase this or that thing. Our landfills are filled to the brim with 
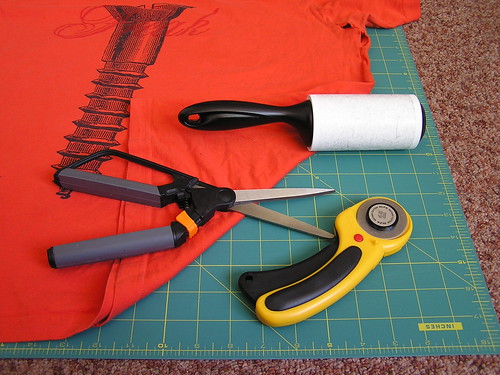
things. You don't solve the problem by throwing out your gas guzzling SUV and buying a SmartCar. You solve it by dragging your bicycle out of the garage, or walking, or using public transit, and saving the car for when you really need it. You don't solve the problem by buying hemp or organic cotton clothing at eco-friendly boutiques. You solve it by wearing what you have until it just can't go any further, and then continuing to use the material in whatever way you can (t-shirts make great dish rags, by the way). We have to buy responsibly, but only after we responsibly use what we already have.

I think what bothers me the most is how little I follow my own rules. Don't get me wrong, I do try. We are diligent recyclers. Our car is pretty good on gas, and I try to find ways to use it less, and more efficiently. I'm really making an effort to conserve energy and water. Yet in the back of my mind there is always a nagging voice (not a real voice. I don't hear voices... yet) letting me know that I could be doing so much better. I've been trying to compost our kitchen waste but the recycled bucket I've been using (my parents buy cat litter in sturdy lidded plastic tubs) is a pain - the lid doesn't come off very easily and it stinks enough that I don't want to waste time playing with it. My first thought is "I should buy one of those little green plastic compost tubs with the carbon filter at the top!" WRONG. I need to put in a little effort, use what I have, and stop being such a wuss. If we want to slow down and maybe even reverse the damage we are doing to this beautiful planet we are so lucky to have as a home, we all need to put in a little effort, use what we have, and stop being such wusses. Every day needs to be Earth Day.

Here's a nice, Un-Earth Day flower to calm things down after all that ranting.


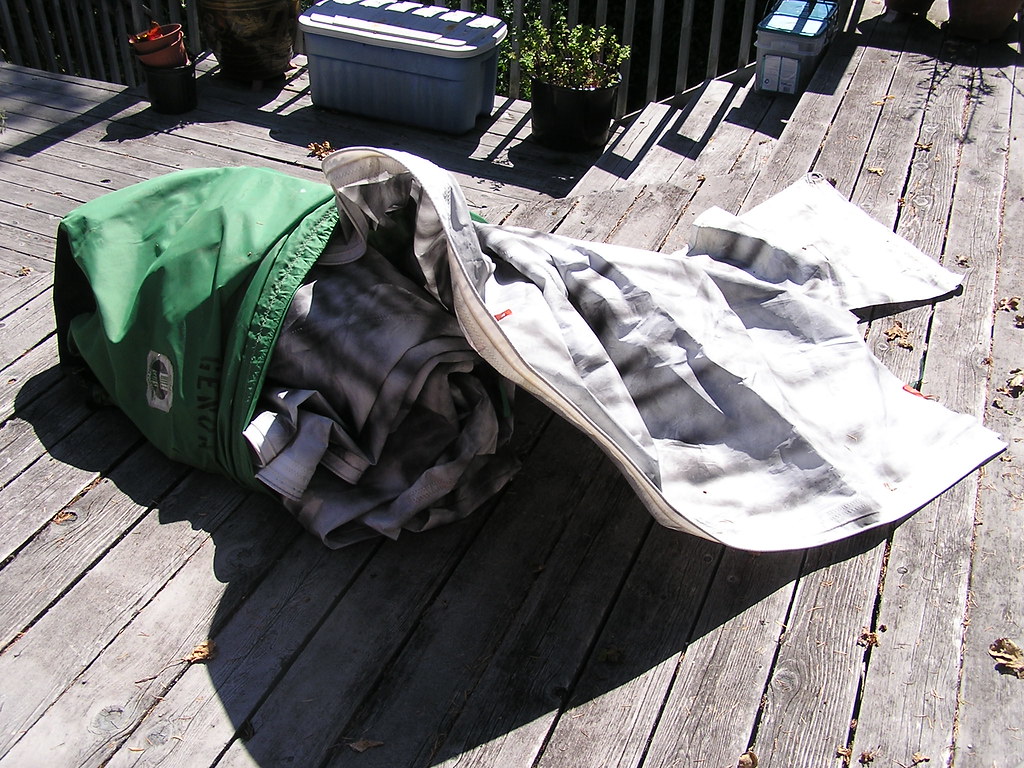
I have taken one eco-friendly step that I am pretty proud of. I completely switched to cloth diapers and baby wipes. In some areas of the world one could (try to) argue that washing cloth is nearly as harmful as throwing out disposables. Here, water is plentiful and is used to generate electricity as well. Disposable diapers, especially with a newborn, quadrupled our garbage output and cost a fortune. Cloth diapers are so easy to use, and, as a bonus, they come in cute colours! Washing them is no more disgusting than taking care of a stinking bag of disposables. Most importantly for us, they don't cause allergic reactions and diaper rash the way both Huggies and Pampers did. R seems to have a very delicate bum.
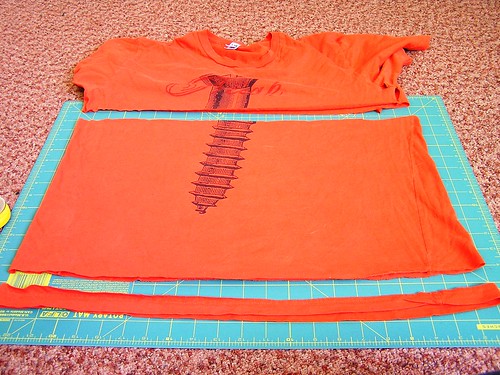
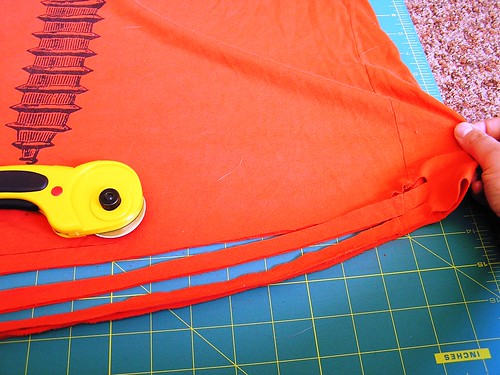
We use Bummis organic cotton prefolds and covers. I can't recommend them highly enough. And hey, if you have enough fabric lying around (you can even use flannel sheets or old t-shirts if you like) you can easily make cloth diapers for your little one. Particularly if you plan on having another child, cloth diapers are so much cheaper. Every time I change a diaper I'm not thinking "eww gross, poop." Nope, I'm patting myself on the back for choosing the best possible option for me, for my daughter and for the planet.

My goal is to change my behaviour so that I feel that smug sense of (justified) satisfaction a great deal more often. Who's with me?

Monday, March 29, 2010

Bathrobe to Burp Cloths!

J's old bathrobe was replaced this Christmas (thanks Mum and Dad!) which is a good thing. It was getting pretty ratty and I may have washed it with something red at one point, leaving a few pink splotches. It was made of a pretty sturdy white 100% cotton terry-cloth-type-stuff with loops on one side and a velvety reverse. I decided it was too good to waste, so I stuck it in a corner of the bedroom floor (naturally, a fantastic place to store potentially recyclable clothing) and waited. When I was in my nesting frenzy before R arrived I realized I had no burp cloths! The horror! I was really pleased with the transformation.


You will need:
  • Fabric. An old terry bathrobe will yield loads of cute cloths. Old towels (provided they aren't super scratchy) would be great as well. Anything soft and absorbent with large flat areas will serve you well. I really recommend making this a recycling project - cloths like these get a lot of use and won't stay pristine for long. It's really satisfying to get so much mileage out of fabric you would otherwise throw out.
  • Sewing machine with fun stitch patterns. If you are lucky enough to have a serger, give it to me! I mean... crack it out. It's worth the threading time to avoid fraying later.
  • Fun thread colours. You will go through lots of thread on this project, so it's a great way to use up those half spools that build up over the years.
  • Lint roller for cleanup. Terry cloth makes a mess. Velvety terry cloth is even worse, as it makes little fluffy bits that stick to you.
Start by tearing your fabric into rectangles. I tore the large panels of the robe into wide strips and then divided those strips into smaller sections. I didn't bother making all the rectangles the same size, preferring to get more out of my robe rather than go for uniformity. If I was making these as a gift I would have been more diligent on that front.
Cut off all the frayed bits. Now you have loads of fluffies to pick up with your lint roller.
If you have the tools, serge the edges. If you don't, join the club.
If your fabric has a soft side, turn that side down and use a wide stitch (like the diamond one I used) to sew a 1/2 inch hem the whole way round. Turn it up as you go, and don't sew right on the edge. You needn't be too precise, they'll look great no matter what. When you get to the corners clip a bit off at a 45 degree angle and overlap the two sides, sewing them down. Make sure the corners are sewn well down or they will fray with frequent washing. Like so:


Use the same stitch to sew down the loose edge. Centre the needle over the edge completely covering it with stitching. This locks it down nicely and keeps it from fraying. I used two different colours of thread, one for each line of stitching. I really like how it looks - just ornamental enough, but not too frilly.


You're done! Snip your thread tails and go :) Take a pretty picture first though, because from this point on your pretty project will be covered in spit-up and drool.

Friday, December 11, 2009

So I Lied

I said I'd be posting more but the evidence suggests I am a liar.

In my favour, we found out shortly after the last post that we were accepted into a housing co-op that we had been hoping to get into for ages. So, the last weeks have been spent moving. I actually sort of like moving - I love the chance it gives you to go through everything and see what you have and de-clutter. I think I am the opposite of a hoarder - I get rid of everything I might not need, and then I ALWAYS need it later. Oh well, It gives me the mental workout of finding creative solutions for not having the things I need. Right? Yep.

So, I love this new place. J measures floorplans of houses for a living and he deduced that we have actually doubled our living space in this new home. We have a room for the baby, a dining area, so much kitchen storage, an outdoor storage room, and, I think best of all, a little patio with a garden plot! Come spring I will no doubt be posting the great backyard revamp (currently it is covered in moss, overgrown with plants that I hate, and generally a little inhospitable).

One thing I do miss, however, is the space the old kitchen had for spices. In memoriam, I shall post photos of my old spice-space. It was my domestic pride and joy. My little spice racks are still out though, which is some consolation.


The bottles are old chemical supply bottles that my dad acquired from the high school lab where he used to teach chemistry. If you are able to find things like this, I strongly recommend replacing the corks. You never know what was in an old bottle and you really don't want to eat some of it. New corks can be purchased at hardware stores, generally in the aisle of bulk bits-and-bobs. Be prepared for a shock, those things cost a FORTUNE.

I labelled my spices by choosing a nice font and colour and printing up a list of what I needed. I then stuck double sided mounting tape (the foam stuff) on the back of the paper where the words were, cut them out, peeled the other side off the tape, and stuck them on the bottles. Not very tricky eh? Thin double-sided tape would work just as well and probably get less damage over time (as it wouldn't catch on things), but I like the way the mounting tape looks. It is a great way to make labels if you haven't been blessed with one of those wicked labelling gadgets. Very cheap and easy.

RIP old spice display...
It's actually better for many of the spices to stay out of the light anyway, so my cupboard isn't all that bad, I guess.

Thursday, May 21, 2009

T-Shirt Yarn Tutorial

Wanna make some awesome yarn out of old t-shirts?
It's great for all sorts of projects, from bags to bathmats and beyond. It's also a fantastic way to recycle the old t-shirts that you and I both know you have stuffed at the back of a closet. You will need
fabric scissors and a flat surface on which to work (I use the floor... ps. check out my heinously ugly carpet. It reminds me of ground beef). For faster, smoother cutting use a rotary cutter and a self healing mat. You might also want a lint roller. You will see why later.

tshirt yarn 2

Step 1.
Choose your t-shirt wisely. I am of the opinion that no side seams is darn near a must. A t-shirt with side seams, no matter how you cut it up, will knit or crochet to make a fabric with little bits sticking out of it. Like the pic on the top. A seamless t-shirt will knit up smooth, like the one on the bottom. Seams can also create major weak points in the yarn, which is no fun at all. If you are as anti-seam as I am, look for men's shirts (preferably in really large sizes). They are far less likely to have seams.


pics 018 pics 019

You also need to avoid t's with too much of a design printed on them, as it will likely prevent the yarn from curling nicely. Make sure the fabric is regular t-shirt fabric, which looks like tiny stocking stitch, rather than a micro-rib fabric. Other than the fabric, the orange shirt I will use in this tutorial is all wrong. It has side seams, and a design on the front. But hey, it's what I had on hand.

Step 2.
Start by laying the shirt out nice and flat, removing any wrinkles from both the top and bottom layer. Using your rotary cutter or your scissors, cut off the bottom hem and the top, below the armpits. If there are armpit holes, make sure you cut below them. This shirt had major armpit holes. It also essentially said "Screw Freak" on it. I only figured that out a few months ago. Hence the reason why I am chopping it up rather than wearing it.

tshirt yarn 4

Step 3.
Cut a strip about 1/2 inch wide, parallel with the bottom of the fabric. Leave about 1 1/2 inches uncut on one side. If you are using a rotary cutter and you aren't used to cutting stretchy fabrics with it, take note. It will create a much better, unbroken cut if you gently tug the fabric AWAY from the cutter (in the direction you are cutting towards). Every time you cut a strip, pull it away from the main body of the fabric a bit, to check for any bits that didn't cut. If you are using scissors (which is just fine, but a bit slower) try to cut a smooth line so there are no little nicks or shaggy bits hanging off.


tshirt yarn 6

Step 4.
Keep cutting until the whole shirt is in ribbons, with one edge still intact. Try to keep your cuts relatively parallel, but don't sweat it if they are a bit wiggly. The yarn will still be good, and life goes on. Try not to let the strips get any smaller that 1/4 inch, or there will be a good chance that they break later on. When all the cutting is done I like to hold it up and wave it around and say "Look! A Hula skirt!" My husband can verify this. You can do it at your own discretion.

tshirt yarn 8

Step 5.
Open up the fabric and drape it over your arm. A sleeve ironing board would also work well, but I bet your arm is easier to find! Begin by cutting a wedge at one end (I start at my... erm... elbow pit. Is there a real name for that?) of the uncut part of the fabric, joining it with the first strip cut on one side. The goal is to make a t-shirt spiral, so you have a continuous loop of yarn. Please, please don't use the rotary cutter for this....Your mother would kill me if she thought I suggested something like that.

tshirt yarn 9 tshirt yarn 10

Step 6.
Continue cutting the uncut fabric. Always cut from the strip closest to your elbow on one side of the uncut space to the closest strip on the other side. If you goof this up you will sever your continuous strand and end up with a bunch of useless t-shirt rings. Ask me how I know this... Verify that the loop is continuous every few cuts by pushing the cut loops toward your elbow and keeping the rest closer to your hand. If the two sections of hanging loops are connected by a single strand, everything is OK.

tshirt yarn 12

Step 7.
Continue Cutting until you run out of strips. Taper the final one off in the same (or rather the opposite, I guess) way as you started cutting way back at the beginning.

Step 8.
Next we have to stretch the yarn, which turns it from something that looks like ribbon into something that looks like string. Starting at one end, hold the strand gently but firmly in one hand with your thumb on the stocking stitch side of the fabric
(originally the outside of the t-shirt). Pull it through your fingers with your other hand, keeping it feeding past your thumb. It may flip over and you will have to readjust it every once in a while. Try to keep it stocking-side-up and feeding under your thumb; it doesn't make a massive difference, but it does help and is worth the very little effort it takes. Stretch it hard enough to curl, but not hard enough to break. You will be able to feel this correct tension easily.

tshirt yarn 15

Once you have stretched the entire length of the yarn, do it again! You will want to stretch it several times. I like to do about 4. You don't need to worry about holding it flat with your thumb after the first time. If you did decide to use a shirt with side seams, I do not recommend stretching the seam points. In all likelihood the stitching will undo and you will end up with a bunch of short yarn noodles. You'll be frustrated. Trust me.

Step 9.
Clean up! When you are done you will be COVERED in little bits of t-shirt.

tshirt yarn 21

If you didn't have a lint roller at the beginning of all this, you may be regretting it now. Happy cleaning, and happy knitting/crocheting! I would love to see what you make!