Ours is mounted on the wall, but it's in the dark, ugly grotto next to the door, so I photographed it resting on a shelf. Where, I might add, It looks awesome.
Get the tutorial for a wall mounted desk calendar, and for the mods to safely prop it on a shelf in the long term, after the jump!
You need:
- Your day planner, or any other book you feel like framing.
- An old picture frame. No glass or backing required. Make sure it's bigger than your open day planner. I found this nice wooden one - oak I think - at the thrift store. I like the wood grain, but if I ever get around to painting our house, maybe I'll paint it to work with the decor.
- 1/2" wide grosgrain ribbon for the wall mounted version, elastic for the shelf version. Or you could use string. Use what works for you.
- Strong thumb tacks, or short nails, or screws. As you may have guessed, this whole project is full of variables. Use what you have on hand!
- Needle and thread.
- Two small wood screws and some picture wire, if you're mounting it on the wall.
- A hammer (unless you have thumbs of steel).
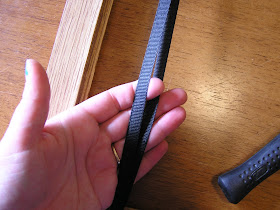
Cut four pieces of grosgrain ribbon just shorter than the height of your frame. Secure them to the frame with your tacks (or nails, or whatever) in pairs. Make sure they are close enough that your opened book will fit between them with about an inch hanging over each side.
The two pieces of ribbon will look like just one when they are tacked down, unless you separate them. Make sure they are quite taut in the frame so your book won't droop.
 |
| Lets pretend my nail polish is artsy and fashion forward OK? Normally it doesn't look like that... Really... |
Decide where you want the bottom of your book to sit, and using your needle and thread, sew the two layers of ribbon together at that point. Do the same on both sets of ribbons, making sure you are stitching the same height from the bottom of the frame on both sides. As long as your ribbons are tacked down fairly tightly and your frame isn't absolutely enormous compared to your book, there's no need to sew above where the book will go.
Done! Hang your frame on the wall using two nails, corresponding to the two loops of picture wire. (you don't want it swinging around when you need to take your agenda out to turn the page or pencil in an appointment).
OK, you say, but I want to prop mine on a shelf.
In that case you'll need something to keep the book from flopping backwards and slipping out of its loops - normally, the wall provides this service. I solved this by substituting elastic for ribbon. Fix it down under tension, but not so much that it doesn't have the ability to stretch a bit more.
Take the two back pieces of elastic, one from each side, and attach them together in the centre of the frame. I used a safety pin here because it happened to be near my hand when I discovered the floppy book problem. It works just fine and is completely hidden. If you prefer a more professional look, sew them together.
There! Your book is safely suspended and can be set in its frame on a shelf!
The ribbon version does look tidier, but the elastic version is easier to use. If you have kids who will be taking the calendar down to enter their appointments, it might be best to use elastic so they don't destroy the whole thing.
If anyone has tips on how to get forgetful spouses to remember their appointments for long enough to get them in the calendar, please let me know.


May and June 2026 two-month calendar
ReplyDeleteThanks for sharing such information – please look
May and June 2026 two-month calendar-Get organized with our May and June 2026 two-month calendar. This printable calendar offers a clear layout for managing appointments, events, and holidays. Perfect for home, school, or office use, it helps you plan efficiently across spring and early summer. Download and print for easy scheduling at your fingertips.
https://datetodays.com/may-june-2026-calendar-printable/